Category: LED Lighting

  • How to Install LED Flat Panel Light

    How to Install LED Flat Panel Light

    Understanding LED Flat Panel Lights

    The first step towards the successful installation of LED flat panel lights is to thoroughly understand what our innovative products are and what they have to offer.

    What are LED Flat Panel Lights?

    Our LED flat panel lights are modern and efficient fixtures to get bright and uniform light. These panels replace old fluorescent ceiling lights. Their use of LED technology ensures energy savings. 

    Benefits of LED Flat Panel Lights

    Discover why our led lighting solutions are becoming the go-to option for both homeowners and businesses.

    • Energy Efficiency: Compared to conventional lighting solutions, LED flat panel lights use considerably less energy.
    • Long Lifespan: These lights are known for their durability. They can last up to 50,000 hours.
    • Better Light Quality: They distribute light uniformly across the entire surface, ensuring no dark corners or uneven lighting.
    • Easy Installation: They can be easily installed with the right tools and instructions.
    • Environmentally Friendly: They are a more sustainable choice by consuming less energy and having a longer lifespan.

    Tools Required for LED Light Installation

    Tools Required for LED Light Installation

    Installing LED flat panel lights requires technical knowledge and the correct tools. The right tools ensure a secure and safe installation process.

    Safety Precautions for Handling Electrical Tools

    Working with electrical tools requires adherence to safety measures. 

    • Initiate all electrical tasks by first switching off the power. 
    • Confirm that your tools are undamaged and in optimal condition. 
    • Use safety gear such as gloves and safety goggles to protect yourself from unexpected harm. 
    • Lastly, employ tools equipped with insulated grips while interacting with electricity.

    List of Tools Required for LED Light Installation

    To ensure a successful installation, you will need the following tools:

    • Screwdriver
    • Wire Strippers
    • Wire Nuts
    • Ladder

    Steps to Install LED Flat Panel Light

    Steps to Install LED Flat Panel Light

    Installing flat panel lights is a systematic process that requires precision and careful execution.

    Planning the Installation

    Planning is essential to a successful installation. Determine the best spot for the light panel, considering its size and the area’s light requirement. Most importantly, turn off the power supply before beginning the installation process to ensure safety.

    How to Install LED Panel Light in Ceiling

    Installation in the ceiling involves a few steps. 

    1. First, pre-assemble the driver to the flat panel, sliding tabs into the raised slots on the panel. 
    2. Next, secure the driver by rotating the lever until it locks. 
    3. Then, remove the ceiling tile at the chosen location and attach the branch power wire from the conduit to the driver.

    Process of LED Light Installation

    Our led lighting solutions make it easy to install LED lights. Follow this step-by-step guide for a smooth and secure installation:

    1. Turn off the electrical power before starting the installation.
    2. Connect the flat panel light to a grounded wiring system, matching the supply voltage with the light’s rated voltage.
    3. Slide two tabs into the panel’s raised slots at a slight angle, then secure the driver by pushing it down.
    4. Rotate the lever until it locks into the panel’s raised slot to secure the driver.
    5. Bend the grid clips up and out at the panel’s edge for installation.
    6. Remove the ceiling tile at the chosen location, then attach the conduit’s branch power wire to the driver.
    7. Tilt and raise the panel into the grid space, lower until clips catch on the tee-grid bar, then support the panel with support wires.
    8. Remove the splice box cover and one conduit knock-out from the driver for wiring.
    9. Connect incoming wires to the driver wires in the splice box using wire nuts, following PCB markings for AC-L (Black), AC-N (White), and ground (Green) wires.
    10. Push wires and wire nuts into the junction box, securing the access plate with the thumb screw.
    11. Replace the ceiling tiles post-secure installation.
    12. Finally, turn on the power to enjoy your new LED flat-panel light.

    How to Install LED Strip Lights

    How to Install LED Strip Lights

    Utilizing our led lighting solutions is a brilliant way to enhance any space with vibrant and efficient lighting. Here is a guide to help you understand the process.

    Choosing the Right LED Strip Lights

    Selecting the right strip lights depends on the purpose and location. Consider the brightness, color, and power requirements. Look for the strip length you need, or opt for cuttable versions for custom lengths.

    Preparation for Installation

    Before installation, ensure you have all the necessary tools like a power supply, connectors, and adhesive clips. Clean and dry the surface where the strip will be installed to ensure the adhesive sticks properly. And plan your layout and measure the length needed.

    Process of Installation

    1. Connect the LED strip to a power source to test them before installation.
    2. Remove the adhesive backing from the strip and adhere it onto the prepared surface, making sure it’s flat and doesn’t bend at the light points.
    3. If the installation involves corners or needs longer strips, cut the strips at the designated points and use connectors for added length or to negotiate corners.
    4. Finally, securely connect the lights to the power supply and turn on the power.

    Troubleshooting LED Panel Light Installation Issues

    Troubleshooting LED Panel Light Installation Issues

    Even though LED panel light installation is straightforward, some issues can arise. Here are common problems and their solutions.

    Common LED Light Installation Problems

    • The LED panel light is not powering on.
    • It flickers intermittently.
    • It does not shine at full brightness.
    • It doesn’t last as long as it should.
    • It is wired incorrectly, leading to malfunctions.

    Solutions to Common LED Light Installation Problems

    • If there’s no power, check your power source, ensure the power cables are properly connected, and verify the power supply’s voltage compatibility with the LED panel light.
    • If the lights are flickering, there might be an issue with the power supply. Ensure power is constant and sufficient. If flickering persists, the panel might be defective.
    • A dim light might indicate an insufficient power supply. Ensure the power supply aligns with the panel light’s requirements.
    • A short lifespan could be due to using a low-quality LED panel or exposing the light to excess heat or moisture. Always choose products from reputable manufacturers.
    • Incorrect wiring can cause numerous issues. Refer to the installation guide and ensure the wiring matches the instructions. If unsure, consult a professional electrician.

    Wrap Up

    Our led lighting solutions offer a sustainable and intelligent illumination choice for any setting. Selecting the ideal LED lights and implementing a systematic installation approach is vital for success. The procedure is generally straightforward, yet you might face a few challenges. Understanding how to resolve these complications can help prevent wasted time and unnecessary stress. Most importantly, safety must be prioritized when handling electrical setups, so never hesitate to contact a professional electrician if you have any doubts.

    Additional Resources for LED Light Installation

    For further reading and guidance, there are several resources available:

    • Manufacturer’s Instructions
    • Online Tutorials and Videos
    • Forums and DIY Sites
    • Professional Electricians
  • Wireless Control for Sports LED Lights

    Wireless Control for Sports LED Lights

    Wireless Control for Sports LED Lights
    Introducing an element of “Dynamic Event Lighting” at the stadium/sports facility.

    What is GigaTera Wireless Lighting Control?

    A Wireless Lighting Control system is a simple communication between the fixture and a control device (tablet) that is housed in an office. From this, the user can control (in real-time) various settings for the fixtures:

    1. Light On/Off
    2. Partial or Full Dimming control
    3. Create “Dynamic Event Lighting” – a unique experience for the client’s stadium/sports facility
    4. Weekly/Monthly/Yearly Dimming schedules
    5. Review energy saving details

    While a MAJOR benefit for you as a solution provider, is to SIGNIFICANTLY SAVE COSTS THAT CAN OCCUR FROM CABLING, CIVIL WORKS, ETC.

    The Wireless system can either be implemented with “Built-in Driver” or “Remote Driver” (Depending on the weight load restrictions of the pole).

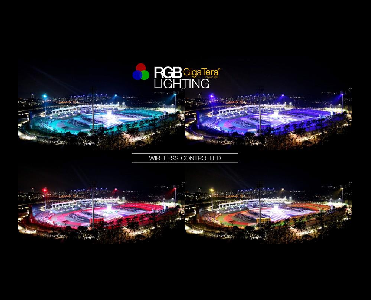
    In addition to this, we can also add GigaTera’s RGB Lighting. It is essential to relay beneficial information to the client about the benefits involved in using such an idea.

    1. Ability to create a unique entertaining atmosphere at the stadium/sports facility
    2. Dynamic Event Lighting sequences during celebratory moments like a Goal or Hole-in-One can give added effect that will leave a lasting experience on the audience as well as the players
    3. Opportunity to be a “National Facility” for important political events and VIP Royal guests by creating an atmosphere of the country’s national colors (for example, Green, Red, Blue, etc.)

    From a procuring and installation standpoint, it is relatively easy to implement such a feature. For example, a regular sports stadium with four poles on each corner, Install 2~4 pcs beam  5-6 SUFA-X RGB or MAHA RGB per pole at the bottom row of pole cross beam. Of course, the q’ty can vary depending on actual site conditions and size of sports arena.

    We highly recommend to check out this reference installation from the YangPyeong Stadium in South Korea – https://www.youtube.com/watch?v=DSefkLWr524

    Yang Pyeong Stadium Showcase Video

    These benefits apply to other field of High Mast, Street Lighting, etc. as well. Do not hesitate to contact us should you require any further information or clarification with this information provided, and we will be happy to assist you with the same.

  • LED is LED… or is it?

    LED is LED… or is it?

    LED is LED... or is it?

    LED luminaire manufacturer are a plenty. We are often asked how we chose to partner with GigaTera and not any other brand. Simply saying…… they have the better products. 

    LED lamps have been known to be fragile in performance if exposed to unfavorable conditions. That seems to be everywhere in and outdoor and external setting of Saudi Arabia. we searched for a product that is protected against extreme conditions yet flexible in design and function that it can meet the major lighting requirements in the sector. 

    Efficiency in LED refers to getting the most light from least power consumption. This is easily possible by overpowering your LED chips, but this is sure to reduce its lifetime. The best efficiency refers to highest light output per watt acheived while maintaining least stress on the chips to maximize its lifetime. GigaTera LED lamps have high lumen per watt using medium power LED chip output, that is Efficiency.

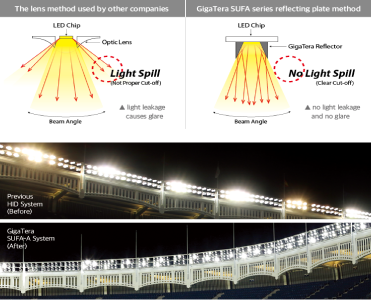
    GigaTera lamps also use reflectors instead of optics. Optics are causes of light loss. they are also causes of lamp failure as we have observed optics degrading and even burn of due to chip heat. reflectors can be designed to meet light distribution angle with efficiency. They can also work together with optics to provide focal power needed in high lighting requirements such as sports lighting. This avoid light pollution. Reflectors also allow indirect light distribution. So you are never looking straight on to a chip which causes glare issue. That is Comfort.

    Contact EGPHIL Solar Solutions to help you with you LED lighting need. You will not need to search anywhere else.